本文来源:机场搭建: 通过aaPanel安装v2board及完成后端对接 。
本文主要介绍了v2board这款v2ray管理面板及对应后端soga的对接过程。
一、环境信息
- Debian 11;
- Php 7.4;
- MySQL 5.7;
- Redis 7.2.3;
- Nginx 1.21.4;
- aaPanel 6.8.23;
- soga: 2.9.4
二、安装
2.1 安装aapanel
官方安装文档: https://forum.aapanel.com/d/9-aapanel-linux-panel-6-5-4-installation-tutorial。
wget -O install.sh http://www.aapanel.com/script/install-ubuntu_6.0_en.sh && bash install.sh 安装日志如下:
Congratulations! Installed successfully!
==================================================================
aaPanel Internet Address: https://2602:fa26:0:7::a:7800/3b56a984
aaPanel Internal Address: https://192.158.24.144:7800/3b56a984
username: cod2lpbe
password: cf25f430
2.2 登录宝塔面板
使用上面的账号密码登录面板:
2.3 安装LNMP环境
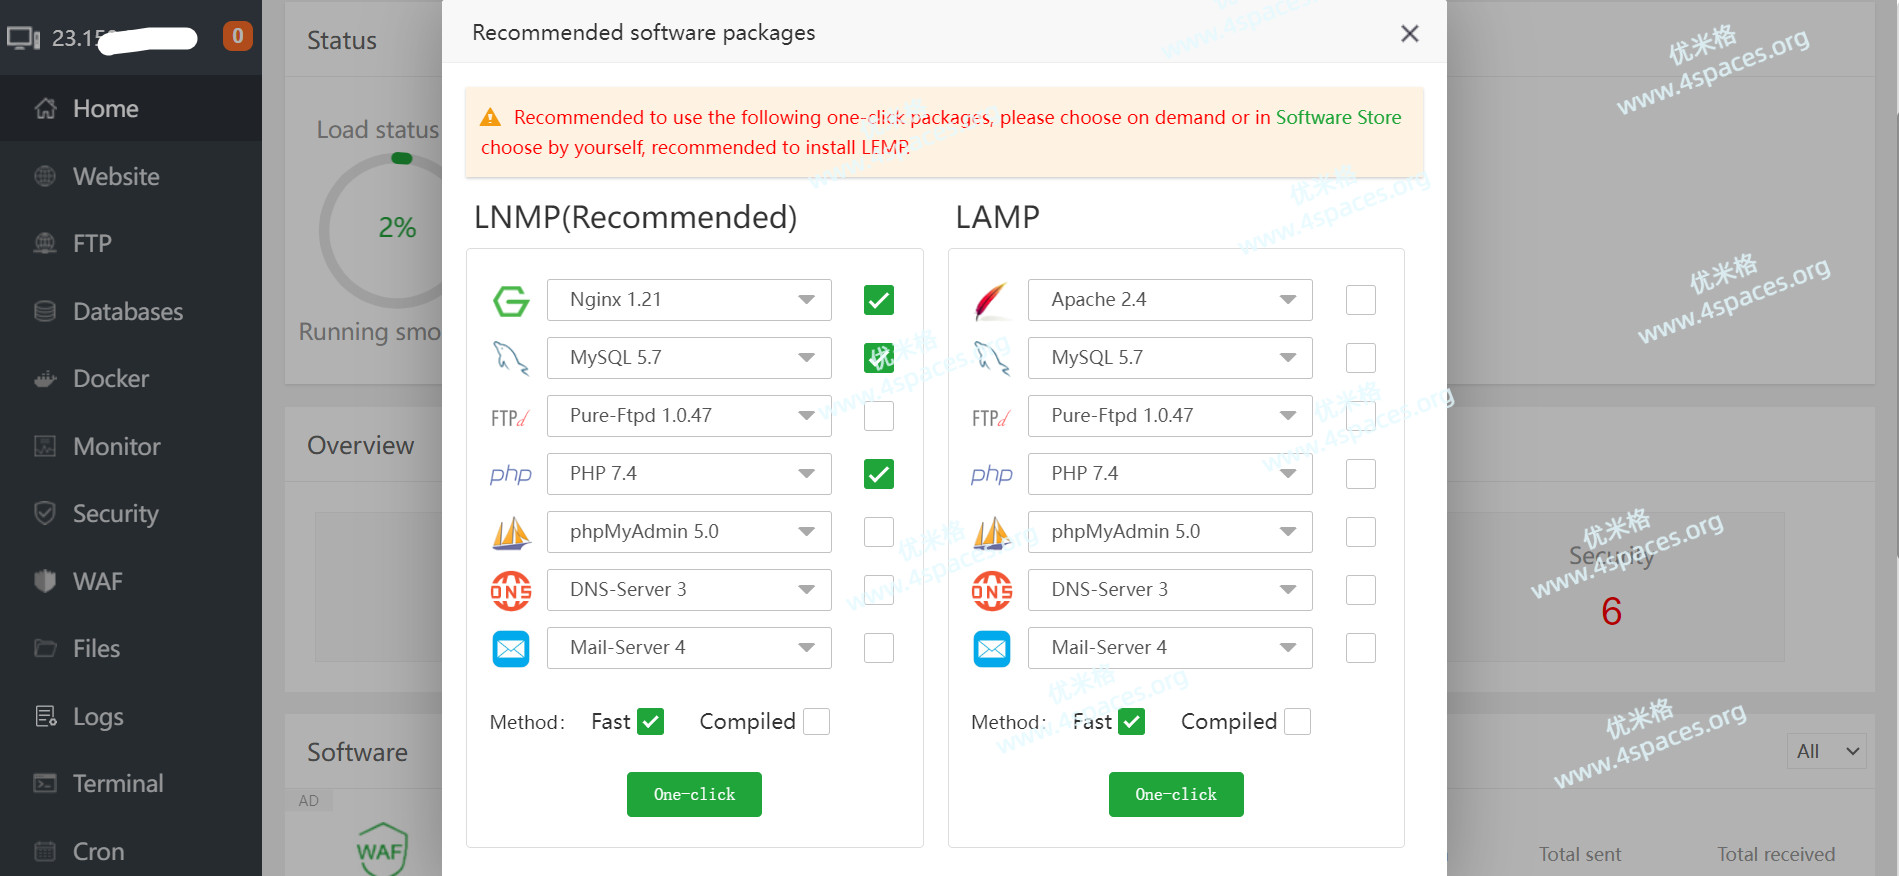
选择使用LNMP的环境安装方式勾选如下信息
☑️ Nginx 1.17
☑️ MySQL 5.6
☑️ PHP 7.4
选择 Fast 快速编译后进行安装。
2.4 安装PHP扩展
登录aaPanel面板 > App Store > 找到PHP 7.4点击Setting > Install extentions > redis,fileinfo进行安装。
2.5 解除被禁止的函数
aaPanel 面板 > App Store > 找到PHP 7.4点击Setting > Disabled functions 将 putenv 、proc_open 、pcntl_alarm 、pcntl_signal 从列表中删除。
三、添加站点
aaPanel 面板 > Website > Add site。
- 在 Domain 填入你指向服务器的域名
- 在 Database 选择MySQL
- 在 PHP Verison 选择PHP-74
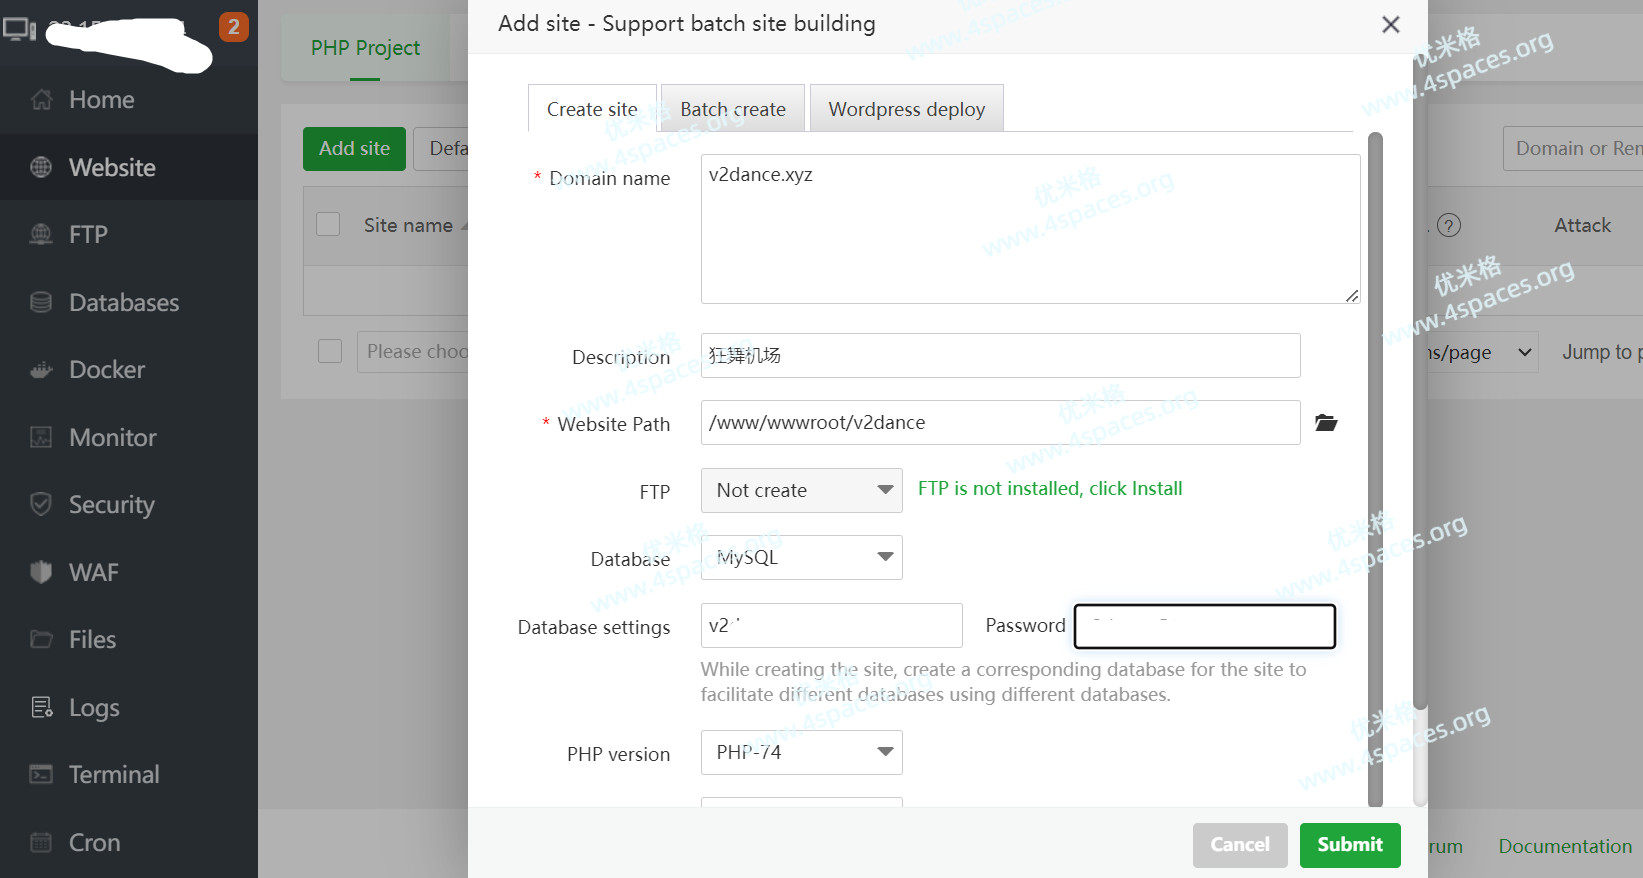
站点数据库信息:
Database name: your_database_name

User: v2dance

Password: v2dance.xyz
然后登录到VPS,修改一下数据库用户密码,防止后面执行数据库脚本提示用户信息不正确问题。
mysql> ALTER USER 'v2dance'@'localhost' IDENTIFIED BY 'v2dance.xyz';四、安装v2board
操作前将站点目录的权限更改为www:
chown -R www:www /www/wwwroot/你的站点目录通过SSH登录到服务器后访问站点路径如:/www/wwwroot/你的站点域名。
以下命令都需要在站点目录进行执行。
# 删除目录下文件
chattr -i .user.ini
rm -rf .htaccess 404.html index.html .user.ini .well-known
执行命令从 Github 克隆到当前目录。
git clone https://github.com/v2board/v2board.git ./执行命令安装依赖包以及V2board:
sh init.sh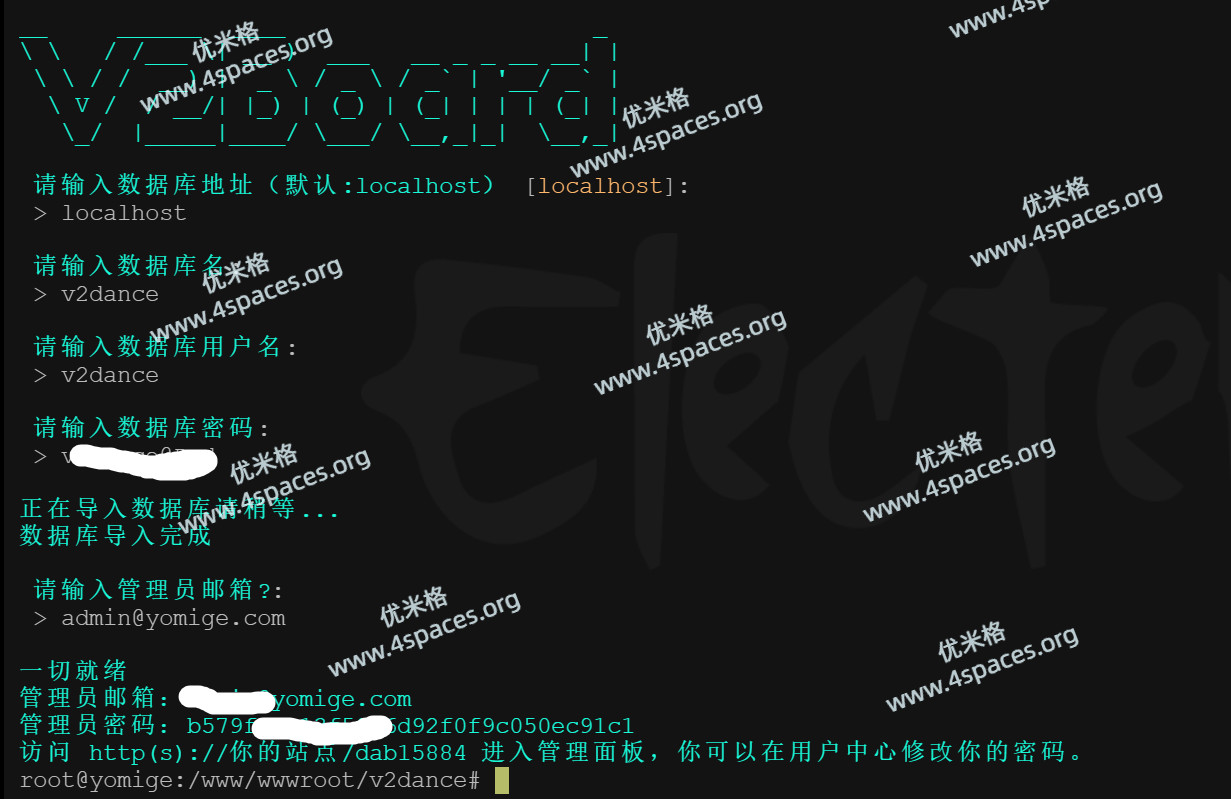
根据提示完成安装,完成安装时打印日志信息如下:
一切就绪
管理员邮箱:  [email protected]
管理员密码:  b579f3bb13f5013392f0f9c050ec91c1
访问 http(s)://你的站点/dab22884 进入管理面板,你可以在用户中心修改你的密码。
比如我的面板地址: https://v2dance.xyz/dab15884。
五、配置站点目录及伪静态
添加完成后编辑添加的站点 > Site directory > Running directory 选择 /public 保存。
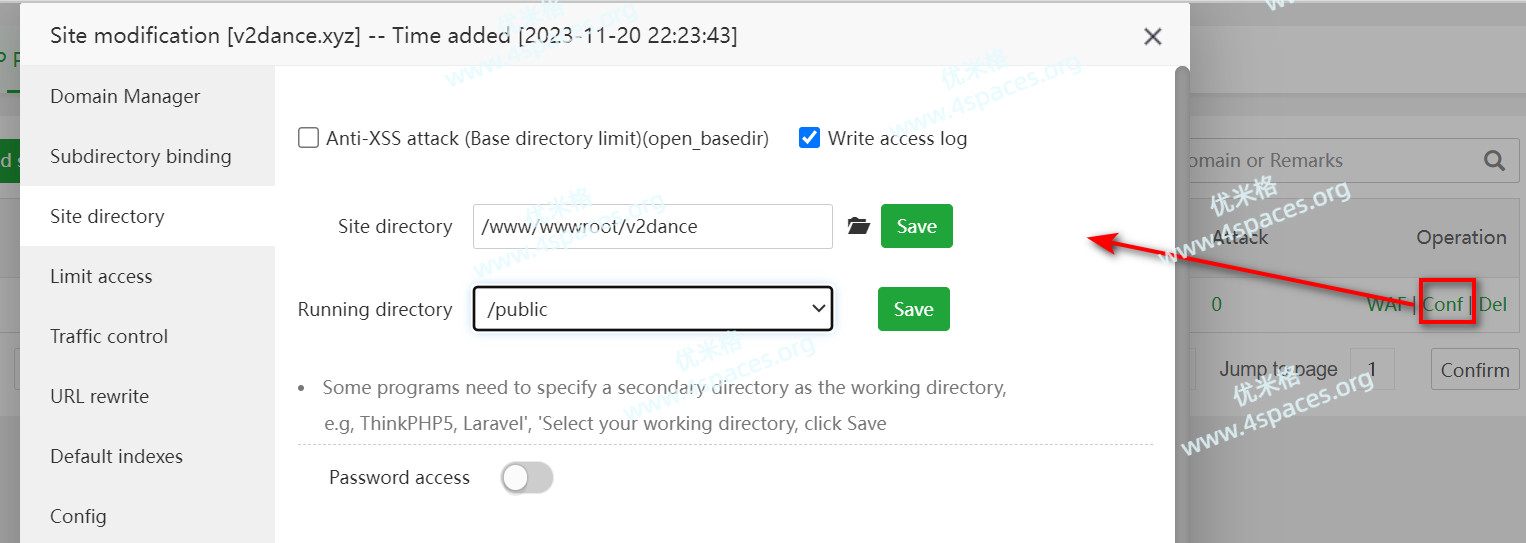
添加完成后编辑添加的站点 > URL rewrite 填入伪静态信息。
location /downloads {
}

location / {
    try_files $uri $uri/ /index.php$is_args$query_string;
}

location ~ .*\.(js|css)?$
{
    expires      1h;
    error_log off;
    access_log /dev/null;
}
六、配置定时任务
aaPanel 面板 > Cron。
在 Type of Task 选择 Shell Script
在 Name of Task 填写 v2board
在 Period 选择 N Minutes 1 Minute
在 Script content 填写 php /www/wwwroot/路径/artisan schedule:run
根据上述信息添加每1分钟执行一次的定时任务。
路径部分需要根据自己情况调整,例如我的定时:
php /www/wwwroot/v2dance/artisan schedule:run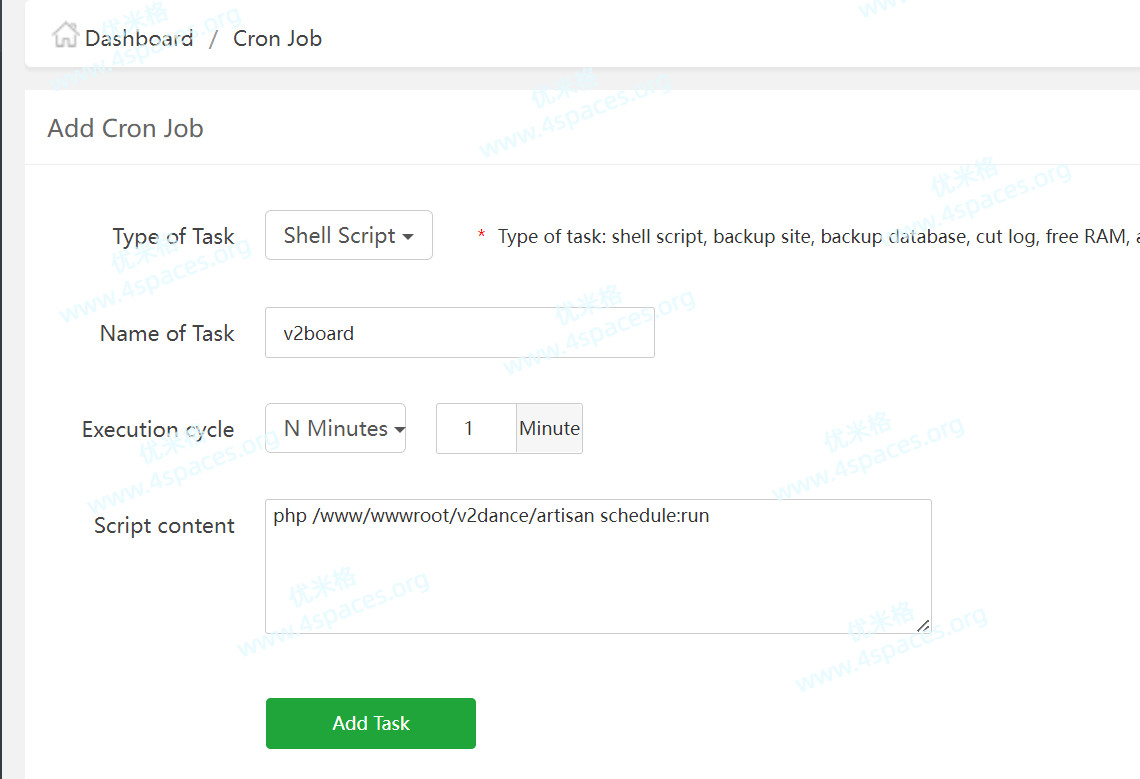
七、启动队列服务
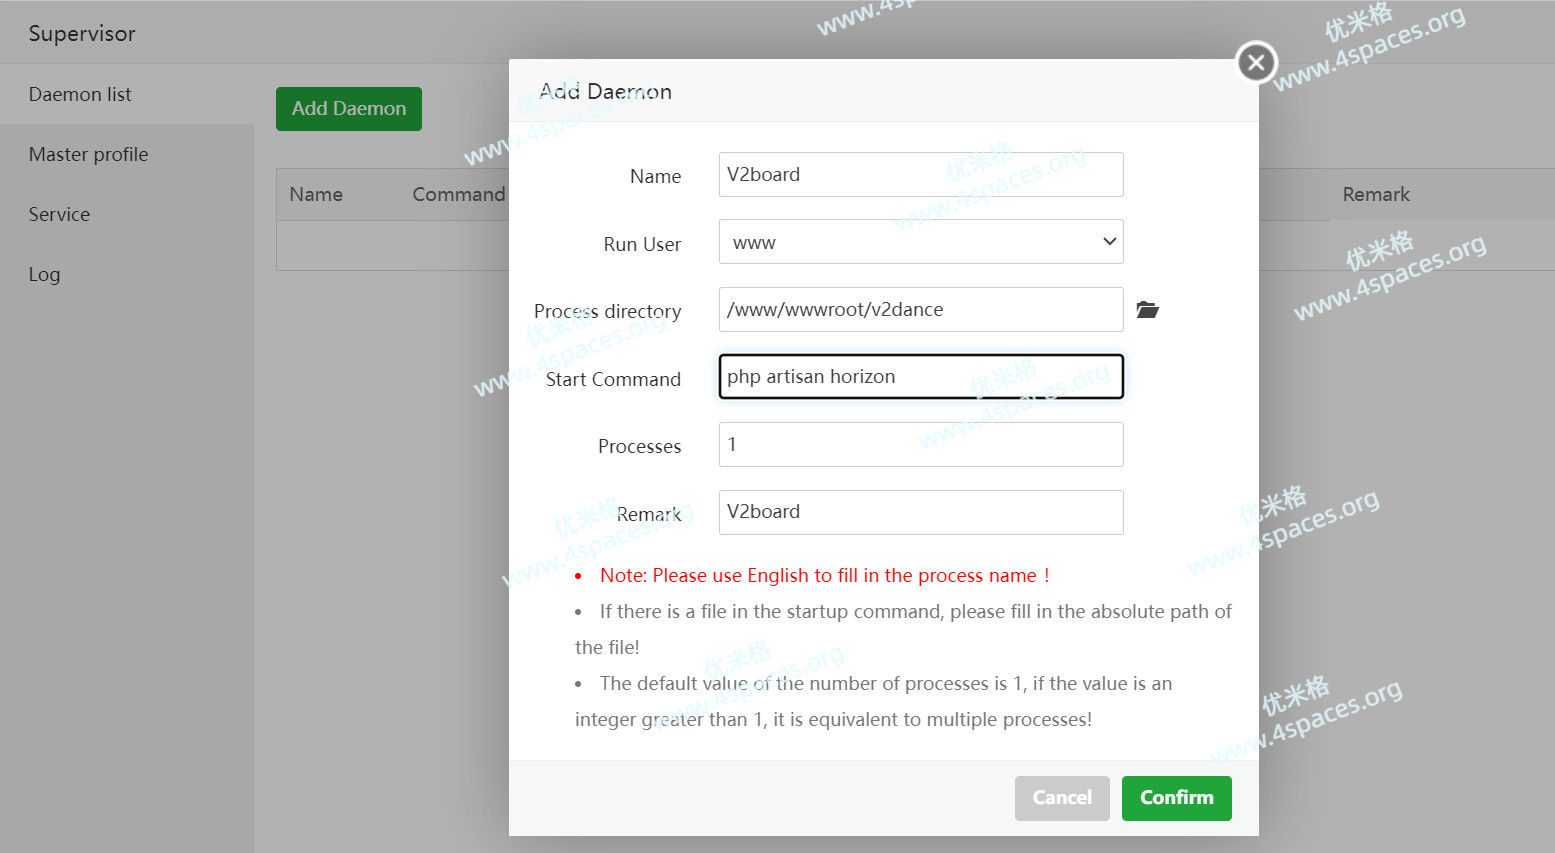
V2board的系统强依赖队列服务,正常使用V2Board必须启动队列服务。下面以aaPanel中supervisor服务来守护队列服务作为演示。
aaPanel 面板 > App Store > Tools
找到Supervisor进行安装,安装完成后点击设置 > Add Daemon按照如下填写
在 Name 填写 V2board
在 Run User 选择 www
在 Run Dir 选择 站点目录 在 Start Command 填写 php artisan horizon 在 Processes 填写 1
填写后点击Confirm添加即可运行。
八、添加节点
在前端面板添加节点:
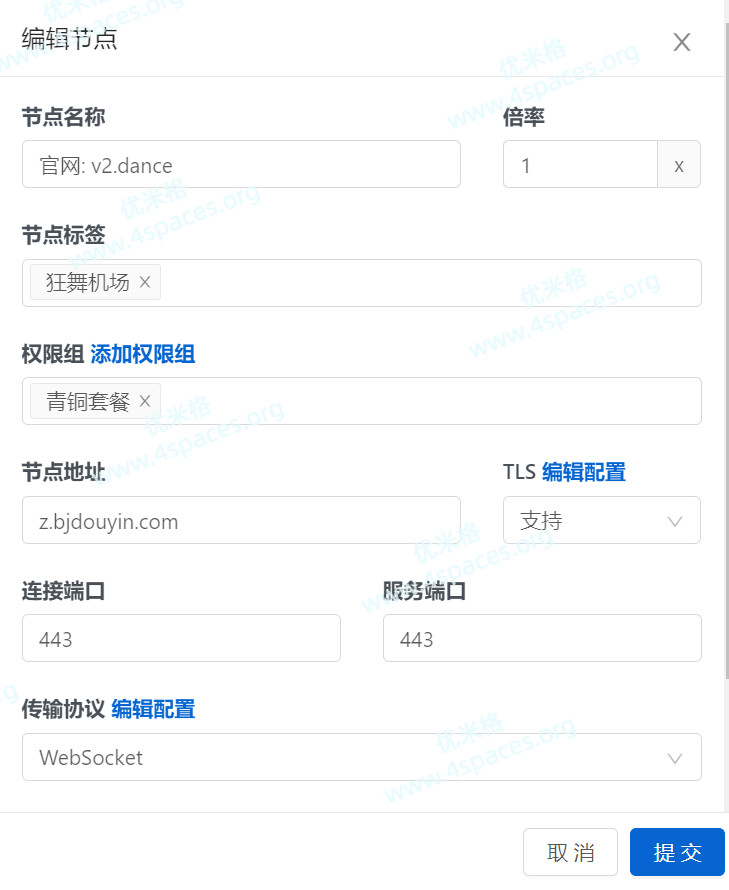
- websocket传输协议——传输协议为 Websocket,必须要点击<传输协议>旁的<编辑配置>,并填写以下内容,path 可以自定义,以
/开头;
{
"path": "/"
}
九、面板soga对接
9.1 安装soga后端
bash <(curl -Ls https://raw.githubusercontent.com/sprov065/soga/master/install.sh)安装日志:
soga v2.9.4 安装完成,已设置开机自启

全新安装,请先配置必要的内容

soga 管理脚本使用方法:
------------------------------------------
soga                    - 显示管理菜单 (功能更多)
soga start              - 启动 soga
soga stop               - 停止 soga
soga restart            - 重启 soga
soga status             - 查看 soga 状态
soga enable             - 设置 soga 开机自启
soga disable            - 取消 soga 开机自启
soga log                - 查看 soga 日志
soga update             - 更新 soga
soga update x.x.x       - 更新 soga 指定版本
soga config             - 显示配置文件内容
soga config xx=xx yy=yy - 自动设置配置文件
soga install            - 安装 soga
soga uninstall          - 卸载 soga
soga version            - 查看 soga 版本
9.2 配置soga
配置文件: vi /etc/soga/soga.conf:
# VMess+WS+TLS 配置示例

# 基础配置
type=v2board
server_type=v2ray
node_id=1
soga_key=

# webapi 或 db 对接任选一个
api=webapi

# webapi 对接信息
webapi_url=https://v2dance.xyz
webapi_key=36f0569d-a205-46yt-8989-d23c01cba685

# db 对接信息
db_host=
db_port=
db_name=
db_user=
db_password=

# 手动证书配置
cert_file=/root/.acme.sh/z.v2dance.xyz_ecc/z.v2dance.xyz.cer
key_file=/root/.acme.sh/z.v2dance.xyz_ecc/z.v2dance.xyz.key

# 自动证书配置
cert_mode=
cert_domain=
cert_key_length=ec-256
dns_provider=

# dns 配置
default_dns=
dns_cache_time=10
dns_strategy=ipv4_first

# v2ray 特殊配置
v2ray_reduce_memory=false
vless=false
vless_flow=

# proxy protocol 中转配置
proxy_protocol=false

# 全局限制用户 IP 数配置
redis_enable=false
redis_addr=
redis_password=
redis_db=0
conn_limit_expiry=60

# 其它杂项
user_conn_limit=0
user_speed_limit=0
node_speed_limit=0
check_interval=60
force_close_ssl=false
forbidden_bit_torrent=true
log_level=info

# 更多配置项如有需要自行添加


最新评论
哈哈,夸张了
作者好厉害
网飞没问题, 迪士尼+有解决方案么?
pp助手是安卓手机用的,根本下载用不来苹果
已解决
这样的话数据库里的结构为{"attachment":{"content":"xxx"}}, 要怎么才能变成{"content":"xxx"},从而使结构保持一致?
赞! make test不过的坑都写到的,谢谢楼主~
谢谢你